2012 ~ Create it. Go!

Saturday, December 29, 2012

Family of Owls

Love these family of owls that my boy and husband helped me make for my little girls for Christmas. They love stacking them and playing with them different ways. I have even seen them in their doll strollers. :)


Monday, December 10, 2012

Little Boys and Superheroes

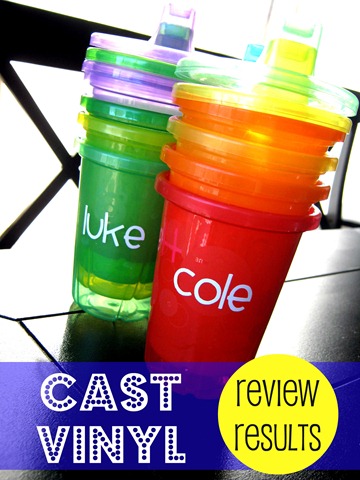
Remember last week when I used my vinyl as a stencil? Well I did it again, same way with this t-shirt.

I made the design first and then cut it out on vinyl. (Contact paper works too, but doesn't cut as nicely.) I laid out the vinyl on the shirt and used fabric paint to paint the design on.

Love the outcome! It makes me want a little boy to wear it! :) (This one is a gift for my nephew.)

Sunday, December 9, 2012

A 13 year old boy mortified!

 I think my son was mortified by this. lol But I had a request for it, so here it is! :)


Having fun with families!

Remember this House of Loved Ones I made several weeks ago? I still love it! And I have to tell you I have had sooooo much fun making more. I get excited every time I make one for someboday else! They all turn out so different, it's fun!
 Parents and two kids (above)
 Parents and two kids and two dogs (above)
 Parents and 4 kids
 Parents and 8 kids! Love all the names going every which way here. :)

Friday, December 7, 2012

Using vinyl as stencils

Had to share!
Love the way this rustic sign for our bathroom turned out and it took me less than 15 minutes start to finish! First off I started with a shortened old fence board (courtesy of the side of the road) :). I cut out my vinyl and used the background (rather than the letters this time). I stuck it directly onto my weathered board and made sure to push down as much as I could around the edges of the letters to make sure the paint wouldn't seem through. 
 Then I took it outside and painted it real quick.
 Came back in with it and literally within 1 minute from painting it, took the vinyl off and got this!
As soon as I get it up in the bathroom, I'll show you how it looks. Thought it would go great with this sign I already have in there:
Yeah for fast and easy projects!

Wednesday, December 5, 2012

Silhouette Dear Santa

So the Silhouette website is having a Letter to Santa contest and I decided I might stand a chance and decided to go for it. :) This would definitely make it an unbelieveable Christmas! But then again, my kids and hubby make it that way just with their presence...not presents. ;)

I wanted to make sure Santa got it too, so I put it under our tree.  :) So, here is my letter to SIL's Santa:


Saturday, December 1, 2012

Christmas...a time for family

I want to thank all of my customers and supporters out there. It's been a whirlwind the last few months since I opened my shop, but it's been great! However, as Christmas approaches, I am finding I have no time for my family, so I am going to slow down on orders after December 10th. Thanks so much for your support and let me know if you want anything before then! (I'll still be posting any fun new projects I have in the works and look forward to 2013!)

Thursday, November 29, 2012

Definition of a Boy and a Girl!

I love the definition of a boy sign I have.
But.........I needed one for my girls room too.
LOVE LOVE LOVE the way this turned out! So fun!!!!

Tuesday, November 27, 2012

Tutorial for Ornament Inserts

Whether you are wanting to make the nativity ornaments or the Minecraft, the inserts all work the same. And they are sooooo easy!

Supplies you will want to already have to make them are:
1. Your Ornament Bulbs (I use both glass and plastic. Bulbs are 2 5/8 in that I use-typical size ones you buy)
2. Your ornament insert
3. Fake snow (Optional: I didn't use this with the minecraft creeper ornament. Your choice.)
4. Ribbon for a bow and to hang the ornament with
5. Hot glue
6. Optional: tweezers...if you need them to help arrange the insert once it is already inside the bulb.
That's it!

The inserts come with the vinyl already applied to the acetate. The acetate is in the shape of an ornament. (see in the pic below:)

Get your bulb ready and pop the top off the bulb and set aside.
You want the little tab on the insert to be at the top of the ornament. Take your insert and roll it up so that it will fit through the opening of the bulb.
Slide the rolled up insert into your Christmas bulb. 
Hang onto that little tab as you get the inset in.
This is where you might want the tweezers. As you let the insert go, it will automatically unroll. If it isn't positioned exactly the way you want it...get your tweezers and move it with them. (You can see below in the pic the tab sticking up at the top in the neck of the bulb. That will keep the insert in place.
This next step is optional. Take a small funnel or just your fingers and drop your fake snow into the bulb on both sides of the insert. Make sure not to fill it too full that it covers up the image inside. 
                                               
After that, you just place the top/lid of the bulb back on. You can add a bow or ribbon to hang it with and you're done!


They are so very easy to make and they make such impressive, gorgeous ornaments! Hope this helped! Maybe I'll try making more tutorials. It was kinda fun. :)


Monday, November 19, 2012

Rustic and elegant at the same time! This chunky little wooden "JOY" is 4 in tall and twice as thick at 1 1/2 in. Painted with a glossy black paint, edges left a little rough, and stamped with swirl in white craft ink. BE.U.tiful! Love the way it turned out! I keep making these Christmas crafts and then putting them away until after Thanksgiving! I can't wait to be able to put them out and enjoy them soon! :)

https://www.etsy.com/listing/115544419/joy-small-wood-letters-finished
(Also available 6 1/2 in tall, same font, and/or unfinished...You paint your own. Convo me if you are interested it this way.)

Minecraft Craze

My boys LOVE Minecraft! I have to say I even like it! I also like that there is a creative mode that they enjoy to the game. Well, if you know what Minecraft it, you will immediately know that this is a Creeper Face. I just had to make an ornament that the kid would like and it was so fun to see their reaction! Love it!


Black Friday Specials!

"BLACK FRIDAY" SPECIALS THIS WEEK! 

Use coupon code: BLKFRI to get 15% off anything in my store from Monday, Nov. 19-Sun Nov. 25. 
YOU CANNOT COMBINE COUPON CODES. ONLY 1 COUPON CODE PER PURCHASE.

http://www.etsy.com/shop/CreateitGo

Have fun shopping!

Thursday, November 15, 2012

Link Parties

So, I have been blogging for forever it feels, but kinda in my own world, so these link parties are new to me, but so fun! I love all the fun creations I see from others that inspire me too. So, I am trying to do more.

Check out the following link parties I am participating in this week:


I am sure my list will grow longer as I start doing more, but for now...gotta make dinner. lol

Have a great night!


WOW! My first feature! And on my Nativity Advent 12 Days of Christmas Ornaments! One of my favs lately. :) Thanks Ginger! You amaze me with your blog, your creativity, and all the crafting and blogging you find time to do.

If you haven't been there, check it out at GingerSnapCrafts.

Frame it Up! A Repurposed wall

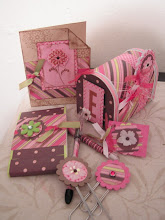
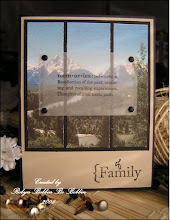
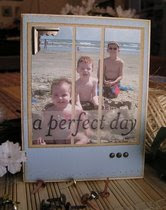
I LOVE repurposing! I also wonder why I keep so many things...like empty frames where the glass has long since been broken and thrown away. It seems that usually, I keep stuff for forever, then finally throw it out, and the next week I think...I wish I still had that! lol Well, today I was glad I kept those frames!

I took a bunch of empty frames I had (and added a few that I took the glass out of for this as well). Painted a few to add some variety and color, then cut a couple more ornate ones out of vinyl (which BTW take a LOT of patience to not only weed, but to apply as well! A oain, but I think worth it, you?) and created a collage or wall of frames on a small wall that was blank in our hallway. I also love love love! that it doubles as a place for my kids to hang their artwork...right inside the frames! So useful as well! Thinking of art, I then decided to add one more touch. Our family in birds on a branch. LOVE the outcome!

Look around your house for what you can use to repurpose. Let us know what you do!


Tuesday, November 13, 2012

House of Loved Ones

 I soooooo am in love with the way this turned out! Love! Love! Love! It actually makes me happy looking at it on my wall. I love my family! :) I'm actually getting our family pictures taken tomorrow from the talented Amy Casas Photography and think this would look great even in between a bunch of those pics! So so excited!
I love how this is customizable for ANY family! Great for a gift for family or friends and so easy to do too! Looks great in even a dollar store 8x10 frame. This one is shown in a larger frame however and a matte with an 8x10 opening. It's what I had on hand. What's not to love?!

Friday, November 9, 2012

Gratitude plate

I love love love cast vinyl! It is a special vinyl that is heat resistant. I have it on some of our household drinking cups with each of our names on them (so that we don't go through three thousand cups a day) and have had it on them for over a year and they are still working great! I put them through the dishwasher almost daily! Love this stuff!

All you need to make this gorgeous plate is:
1. A run to the dollar store to pick up a plate
2. This vinyl
3. 2 minutes to apply the vinyl

Yep, that's it!

Great for display in your home, for Thanksgiving dinner and to use as a plate to give away goodies to friends and family!

What's not to love? :)

https://www.etsy.com/listing/114563705/gratitude-in-cast-vinyl

Happy Thanksgiving!

Wednesday, November 7, 2012

Ginger Snap Crafts


Have you checked out Ginger Snap Crafts? I love her site! Love all her fun ideas and crafts she makes. Her WOW me Wednesdays are the best too, bc you get to check out all kinds of neat creations from soooo many friends!

Here are a few of her turtorials/projects I like:

http://www.gingersnapcrafts.com/2012/01/tutorial-diy-canvas-prints.html


http://www.gingersnapcrafts.com/2012/08/diy-cute-easy-blocks-tutorial.html

and

cast vinyl review results

And if you are wanting to help out with people affected from Sandy, she has a great collection going on.


Give-Away

So...I have been meaning to have a give-away ever since I opened my etsy store. So here we are! Yeah!

So, here's the deal:

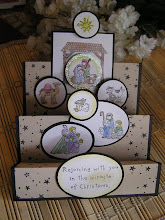
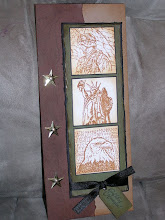
I will mail one acetate/vinyl insert of the Holy family in a stable nativity scene (like shown in one of the pictures below) for you to use to make an ornament. I will do this for the first 20, yes 20!!! people that enter.

These make wonderful teacher gifts, gifts for friends and/or family, or keep it for yourself! They are super easy to make! You can buy glass ornament balls to put them in or if you have little ones at home, you can even buy plastic bulbs that look like glass! You add a little fake sparkly snow and a ribbon and wala! Everyone will be soooo impressed with the ornament you made!

So, the rules...
You have to post a picture AND a link of the Nativity Advent/12 Day Set of Ornaments shown here in my etsy shop:
https://www.etsy.com/listing/114317026/nativity-advent12-days-of-christmas
or shown on the previous post on this blog.

You need to post it to at least 2 of the following:
Pin it to Pinterest
Your FB page
Your blog

Then come back to this blog and comment to me (with links if pinned or to your blog) what you did and let me know your favorite item in my etsy store as well.

Okay! Let's play!

I will send the inserts out within the next 1-2 weeks. I will need your address as well if you are one of the first 20 to enter. If you want to msg it to me privately on my Fb page, feel free to do so,

https://www.facebook.com/CreateItGo

Thanks for playing!
Robyn


Nativity Advent/12 Days of Christmas Ornament Set

I came up with the idea of this set last year and just got it done finally! I love the outcome!

I had wanted something that was fun to open with my kids (like an advent calendar) that was also centered around Christ and love that we can open these ornaments up and hang on a tree each night the 12 days before Christmas.

Our family also likes to secretly take gifts to other people for the 12 days before Christmas and this is such an affordable idea. I love it!
 This 12 piece set is composed of an acetate ornament shape with the following vinyl already applied to it:
Joseph leading Mary on a donkey
Words "O Holy Night"
One sheep
One cow
Three separate wisemen
One shepherd
One shepherd with a sheep
One star
One camel
One Holy Family in a stable
 The inserts are so easy to use. They come ready to just roll up and place inside an ornament ball. Then you can add some sparkly fake snow if you heart desires. :) Put the top back on and add some ribbon and you're done! Easy peasy!
 I wanted something to display them all on other than the normal Christmas tree, so I went outside and found a branch I liked. I spray painted it white and stuck it in a tin can with some Plaster of Paris. Spray painted the can a flat black and added some burlap and ribbon. I then added a string of white Christmas lights into the can to add some light to the whole thing. My two year old daughter was in awe. lol
Love the rustic look that was created, so I went with some rustic fence wood behind it all and added some vinyl letters as well with the words "O Holy Night".

(Just an FYI too, vinyl applied to raw unfinished wood like shown does not stick well and is not easy to do. I just wanted the look and plan on it not sticking long. You will want a smooth surface. One other option would be to use the vinyl outline of the words as a stencil and paint the letters yourself. I've done that before and it works great!)