January 2013 ~ Create it. Go!

Thursday, January 31, 2013

The start of a new line...

...of products by me!!! Baby Onesies!!! Onesies are bought from the store, but are designed and painted or have heat transfer vinyl applied, by me. Because each is individual and made by hand, there may be slight variations or imperfections on them, but basically...they look great and will get you lots of comments!!! Not to mention they will look adorable on your little one!

Now I only wish I still had a baby to put them on! lol

 This one cracks me up!
 My kids all have this on a shirt. ha!
 One of my fav little boy ones!

 Another fav that is a GREAT gift for newborns! Custom made to include the mother and the father's names.
 And these always look so sweet on little girls. More variations of this design coming. (Two bead strands and varying colors and rosette clusters.) The rosettes are grouped together on a piece of felt and pinned to the onesie. They will need to be removed before washing.
And for the grand finale...drumroll please...
I am so in love with this last one. I may be a bit biased. hee hee  It even has the badge number personalized for a friend. :)
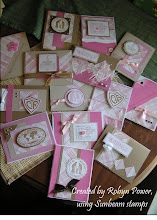
I was literally giddy today as I saw how they were all coming out all together!
 Didn't they turn out so fun?!!! Again, I know I am biased, but I am loving making these onesies. It's kind of addictive...I already have more cut out ready to do too. They all will be in my shop shortly and individually priced. You can look forward to seeing the boy and girl definitions on onesies and more!

Wednesday, January 30, 2013

You wake 'em...heaven forbid!!!

Love how fun this little wooden doorhanger turned out. A quick and easy project! And so fun and hopefully helpful too! Would be a great gift for new mothers or at baby showers or just fun for a friend. 
 You can hang from your front door or even from a door inside you house to remind others to be quite during naptime.
 Hang from a wreath hanger...
Or from a nail in the middle of your door...any way you display it, it will surely be noticed and bring a smile...and hopefully keep it quiet too. :)

Tuesday, January 29, 2013

Too funny not to share...

I thought this was hilarious. I have this little whimsical pennant banner up in my girls room on their wall. We added some fun vinyl birds to it too and love them!

Well, my son had his parakeet out one day (He walks around with it sitting on his shoulder sometimes.) and where did the bird decided to fly????!!!LOL I thought it was great and grabbed the camera!

Monday, January 28, 2013

I was PINNED!

Or rather I passed the "Pin or Pass" test! (I'm loving the play on words here.) {giggle}

A new friend and customer just wrote this review on me and my shop and the "hello" originally made my Ginger Snap Crafts. You can read it here at Pin or Pass.
(or here: http://pinorpass.blogspot.com/2013/01/pinterest-product-review-vinyl-hello.html)

This was the custom sized hello in vinyl she ordered from me. I have to say that while I am flattered by her review, I also just LOVE that I get to see a pic of how her vinyl turned out. I hate hearing the stories where they don't...due to one reason or another, so thanks for the pic Jennifer!
Vinyl hello sign for a quick front door makeover
Jennifer has this great site where she reviews Pinterest finds and deems them worthy of making or passing on them. LOVE this idea! Thanks Jennifer and I will definitely be checking back with you!


A Tree for all Seasons

Remember this tree I made for my Nativity Advent/12 Days of Ornaments? You can use it year round!

I never did a tutorial and had meant to, but it was REALLY easy. So here are some quick and easy basic instructions on how I made it.

First gather the materials you will need to make it:
1. a branch from a tree
2. a container to put it in. (I have used a flower pot before, but this time I used a metal can I had on hand and spray painted it with a matte black.)
3. Plaster of paris
4. Water
5. White spray paint
6. Optional: string of lights and ribbon to decorate the base

After you have gathered all of your materials, you are ready to start assembling the tree.

Instructions:
Start by spray painting the branch white. It dries super quick too.(I did a couple of coats, b/c some of it is soaked up into the branch.)

Then you mix your plaster of paris and water (I just followed the directions on the box it came in.) and pour it into your container. (Note:Don't rinse out the container you mixed in, in your sink. I know! It ends up in your pipes and hardens and your husband isn't too happy as he takes the pipes apart under the sink...but really it was partially his fault. I didn't dump it down the sink. I just put water in it to soak and he dumped it not knowing what was in the bowl. lol)

Next, you hold your branch in the center of your container as the plaster of paris dries. It doesn't take too long.

You really are pretty much done at this point, other than some simple decorating add ons if you want.

So easy! AND great for displaying year round!

Here is how mine is displayed now:
 Last year I made these cute little felt hearts with little rosettes on them and hung them in a line from my ceiling above the buffet in my dining room. This year, I left them on the fishing string and just kinda draped them all over the tree.  Set them on top of my piano next to some snowmen and love it!
If you ever make one of these, I would love to see what you decorate it with. Link it up as a comment!

Sunday, January 27, 2013

Mood Pillowcases


I have to tell you that I think my husband is embarrased by these, but I think they are hilarious! You flip them over and they say the opposite on the other side. :) I think they would be great even as a surprise on Valentines day to all of the sudden just have on the bed. lol I have to share what a friend told me too. (Hope she doesn't mind...) Her husband saw them and said "We need those! I just can't read you sometimes." Cracked me up! Love em!
 I used my vinyl as a stencil to make these with fabric paint, but I also will be making them and getting the exact same look by using heat transfer vinyl.
(using vinyl as a stencil shown below, as well as a tutorial on the "how to" section:)


You can be looking for a special March/St. Patrick's day version of them coming soon too. :)

Saturday, January 26, 2013

Spring cleaning...blog style

Well, technically it's not quite spring, but these high temps we are getting here in TX are making it feel that way. So it was time for spring cleaning on my blog! I am soooo excited to have this great new re-vamp on here! It will allow me to share so much more with you. Hopefully the URL/Domain name change won't mess too many people up, because I would hate to lose anyone, but it was needed.

So...look forward to all kinds of new ideas, shares, and info coming soon and bear with me as I get all the kinks out for now!
Don't forget to grab a button! :)


Friday, January 25, 2013

Rustic Valentines Garland


 Don't you love garlands? Pennants? Banners? There is something delightful about them. They dress up any area and add some light hearted fun. There's a word on the tip of my tongue that comes to mind with them, but I cannot seem to think of it....
Love how this rustic raw wood garland turned out. I wanted it simple, but wanted just a touch of color. I think the red ribbon tags did just that! Originally I was going to drill holes in the wood and hang them that way, but this was fun too.

I am seeing all kinds of things you could do with this. Last names that can be hung up all year, First names...laying them flat down a long table as a centerpiece...so many possibilities! I've thought of a couple more that I will show you later this year too. :)

Homecoming in Texas

So, I had never heard of mums before I moved to TX in high school. But I got to make my first one last night. I have a 7 year old mini-cheerleader and our school's homecoming is today. (They don't have football at our school, so basketball is the main sport, thus homecoming in January.) I had a lot of fun making it although it was hard to find stuff to make it with, since for most, it is not "mum" season right now. I ended up not finding a large mum for the flower, but used three white carnations and put them all together. 
I love her face in the above pic. I can tell what that she loves it!
 I actually used my vinyl cutting machine to do all the letters on the ribbons and the cheer megaphones and basketballs and it worked great! Didn't have to buy near as many kinds of ribbon or sticker letters this way. 
I have no idea what the ones they were selling at her school will look like and how hers will compare, but I think hers turned out super cute and a great size for her. She seemed happy. And who knows if I will get to make another one ever? We have talked of moving out of state later this year...who knows where else they do this in the South? Anyone?

Glad she will get at least one. :)

Tuesday, January 22, 2013

GIVE-AWAY!

Yeah!!! It's give-away time! FINALLY! (Kids are in bed...for the moment...lol, so here we go!) 

So, I have been thinking so much of the quote I just posted more pics of..."Believe there is good in the world, Be the Good." 

Especially with all of the scary things that our country has experienced lately. I would love for more people to have this in their homes. To help inspire us all, to help teach our children, to support our LEOs out there who try and be the good and protect us each day, to help us all to believe in each other and to be better people. SO....as promised...I am hosting a give-away! I want to give away THREE of these to you!! 

There are three different ways shown of displaying them...and you can choose which way you want it if you win! I am also wanting my children included in on this, so...we are doing this the old fashioned way. They will help me choose the winners. 


 To enter: 
1) Like my FB page (here) if you haven't already and share the giveaway and a favorite item from my shop on your FB page 
2) Pin something from my etsy shop on Pinterest (or on your blog if you don't have a Pinterest acct...and if you don't have that, well...be creative and help me share somehow.)
(Etsy shop here.)
3) Then come back here or to my FB page to let me know you did those things AND leave your own favorite uplifting quote there as well. (I am always looking for new ones to put into vinyl!) I will let my kids read the quotes with me and help me choose.

Give-away ends January 31st. Good luck!
***DEADLINE EXTENDED to FEBRUARY 7th!!!!***


Monday, January 14, 2013

Monograms and More Monograms!

I have to say I LOVE monograms! I think they add something that makes them feel special. They personalize things. They make them YOURS. :)

I also love rustic. I love all the newer wedding rustic and simple decorating themes. I love mason jars. I keep trying to find the time to make the mason jar soap dispenser. And have you seen the cool chandeliers you can make with mason jars?! Going to do that too!

Well, mix all those together and you get...


LOVE!!! This one (above) has some epsom salt around the outside of the bottom as well as inside with a tea light candle. So pretty done all the way down a long table as centerpieces. Love the raw wood with it too, bark and all!
A little closer view of the salt.
Did this one in a larger jar with a lid and love the pretty colors!
 I have to say I think this (one above) turned out sooooo fun with the checkers board and bandana underneath it as a centerpiece. AND the epsom salt around the top rim ended up being my favorite way to use the salt!
 AND....want an easy route? Just buy a candle at the store and add a monogram to the outside of the glass (shown above and below). I used the fake spray snow to add some texture on the one above and some more salt on the rim to the one below. So many options...so easy...so fun...and personalized and unique!
 Now, to just get our towels monogrammed....:)

Have a great day!
http://www.etsy.com/shop/CreateitGo