April 2014 ~ Create it. Go!

Wednesday, April 30, 2014

Lemony Brownie Recipe Share

I saw this recipe a few weeks ago and FB and then a friend made them before I could, but they were soooo good, so I wanted to share the recipe with you too!

Lemony Lemon Brownies
from BeckyCharms & Co.
recipe found here


BUT today I am making a different version of them, altering some ingredients to be a bit more healthy and adding some lime essential oils as well. It's in the oven now and smells sooooo good! I'll post how it goes another day for you! For now, though, this recipe tastes great! So go check it out here at BeckyCharms & Co,

Tuesday, April 29, 2014

Teacher Appreciation Gift Ideas from the FB Silhouette Challenge Group

Remember awhile back the FB Silhouette Challenge Group I joined? Well, I love that group! Everyone is sooo supportive and helpful and I love the positiveness that breeds on that page! I haven't had a lot of time to participate in the last couple of challenges, but got to be part of their most recent round up that Ginger from Gingersnapcrafts put together...Teacher Appreciation Gift Ideas. She did a great job compiling them all. Check it out on her website here!

20 Teacher Gift Ideas at GingerSnapCrafts.com #silhouettechallenge #thesilhouettechallenge #silhouetteCAMEO #silhouetteportrait
[from%2520the%2520Silhouette%2520Challenge%2520facebook%2520group%255B6%255D.png]
Love all the great ideas and inspiration that came from everyone here. And who doesn't love
getting help with teacher gifts?! Love the Birthday board for the class!!! What has been your most favorite teacher gift you have given or received? I always love hearing back!

Friday, April 25, 2014

Spring Spirit

I made this spring wreath a few weeks ago and added some school spirit to our front door along with it. So much more fun than the plainness that used to adore the door. :)

I liked the simple light colors, but with a white door...wasn't so sure. Then I added lmy "old" sign to the middle and loved the color it added as well.


...From the inside:


Of course, now I already have another idea in mind, so we'll see how long this all lasts. But for now...it's fun! :) Gig' Em Aggies!

Wednesday, April 23, 2014

Sew Simple Peasant Dress

I didn't know if I could top last year's cuteness with my girls Easter dresses I made (found here),

...but I think they turned out adorable again this year!

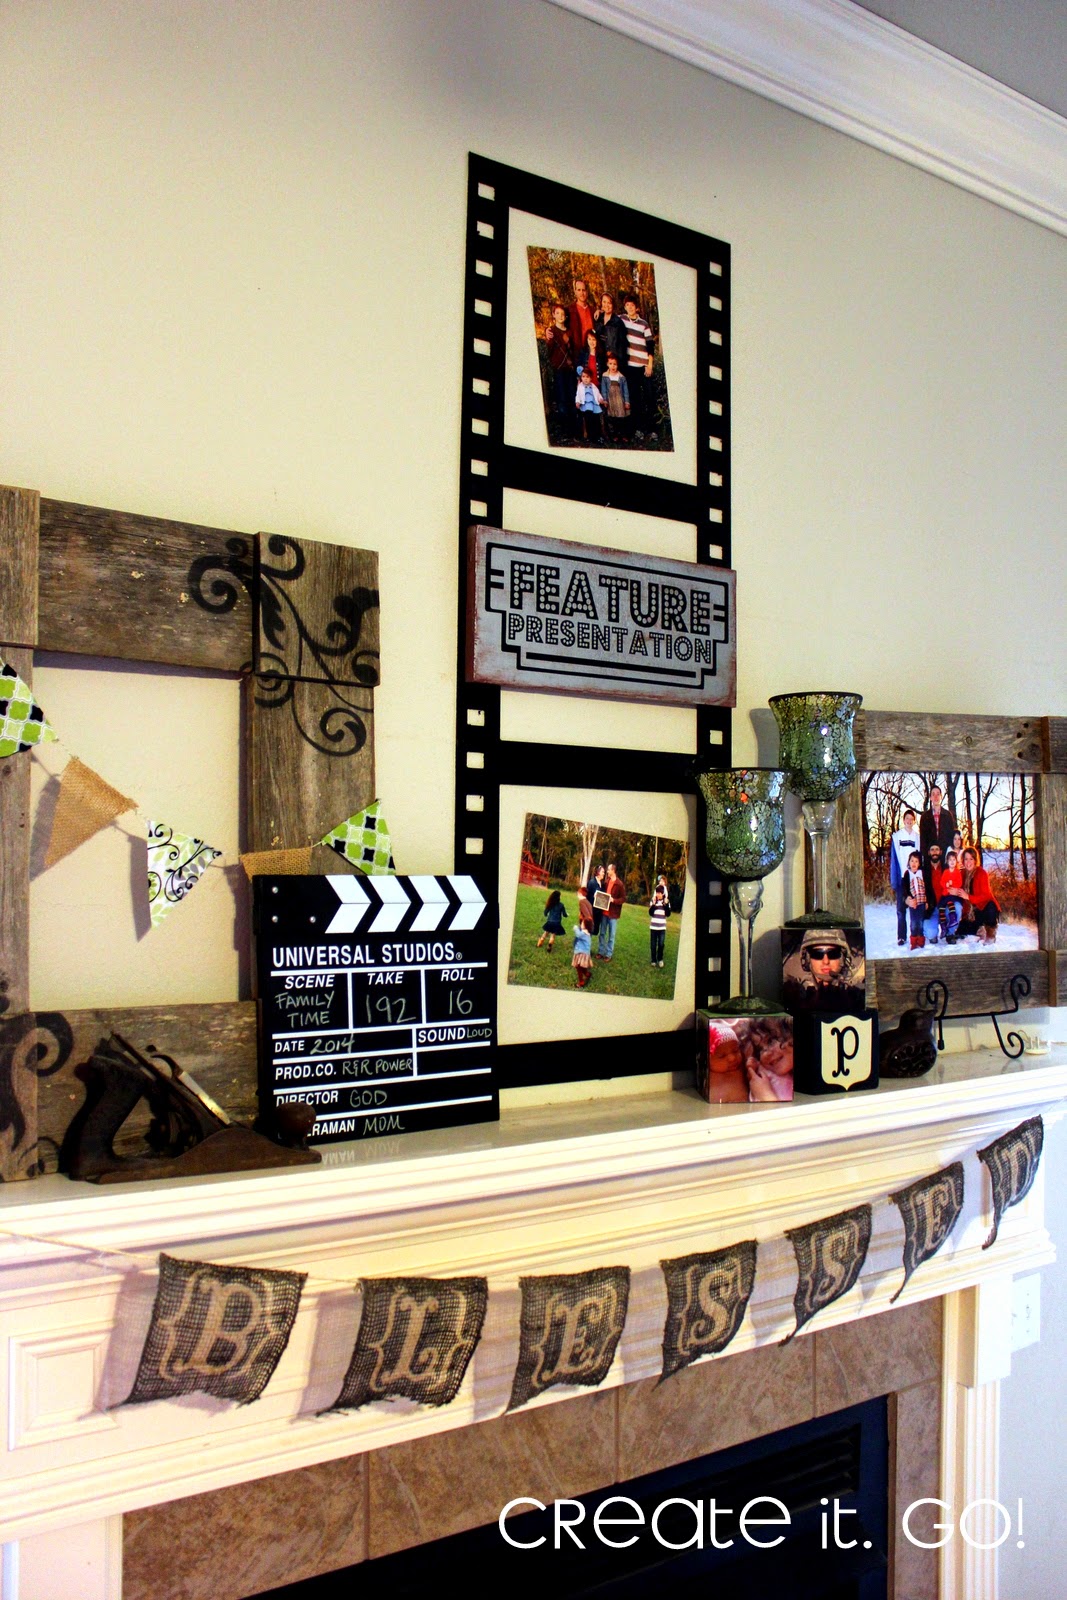
Here they are finally done the night before Easter and ready for the girls to put on the next morning.
And now on them later the next day! I considered it a huge win bc they each thought their own dress was the best one! BIG smiles from everyone! And it really was a super easy and fast pattern. I will be using it much more for even nightgowns (without the belt) in the future.
AND I love that I found matching chevron ties for all my boys on etsy too! Was too fun all together and not too matchy matchy for my husband and boys too. (I found them on Sewn by Maria's shop here. She was great to work with!)

After we got home from Easter Sunday church, I told the kids to head out back before they changed and set up the tripod. We had a little bit of fun. ;) haha


The girl's dresses came from inspiration I found on pinterest by looking at several patterns and dresses I found there and mixing a few of those ideas together. If you want to see my Sewing board and pins and my fabric flower inspirations I found on pinterest, you can follow me on Pinterest here.

Here you can see the fabric flowers a bit better. I did them each a little different from the other. I also let each of them choose the colors of their fabrics so that they had apart in it too. They all wanted to help me here and there making them too. It was funny bc my oldest daughter complained a few weeks ago when she realized I was going to sew them again this year rather than buying them. In the end though, she loved it! I asked them here, "Who likes Easter?" And got a great response!

The main pattern I used was from Scattered Thoughts of a Crafty Mom here. Although I found the post and free pattern posted on GingerSnapCrafts here. I changed it a tad here and there to fit my girls a bit better, but it was so easy and great!!!

And the little one was ready to be done! haha Can you tell?
So, will I make them next year again? Maybe. I have a hard time finding skirts and dresses that I consider long enough and dresses with sleeves as well. I actually cut these really long and figured I can take out the hem when they start getting to short and they might fit them even longer! AND...I really do enjoy making them :)


Friday, April 18, 2014

Good Friday Share {Hot Cross Buns}

I don't know about you, but I have never made Hot Cross Buns, but I saw this recipe on The Pioneer Woman and it looks so good and what a great tradition to start on Good Friday, so I thought I would share!

TPW_3253
(picture is from The Pioneer Woman)

If you have never been to The Pioneer Woman's site, it's great! So many great recipes! You can find the Hot Cross Buns post here. They have step by step instructions and pics, so I can't mess it up, right?! haha

We, as a family have been studying the life of Christ starting from his birth and on through him growing older and in favor with the Lord, to his Atonement, crucifiction, and resurrection this week. This will be great for our Good Friday! What are some of your Easter traditions?

Thursday, April 17, 2014

Good moms let their kids lick the beaters...


I took this pic not too long ago of my youngest and it reminded me of this quote I put up last year. Might need to frame this pic alongside it. :) Guess I am a GREAT mom, huh?! hahaha

Good Moms Vinyl

Wednesday, April 16, 2014

Rice Crispy Treat Easter Eggs

Need a quick idea for a fun easter treat for the kids? These are super easy and sure to please!


Just follow your typical directions for making rice crispy treats, but instead of placing them in a pan, make them into Easter egg shapes!

Recipe:
1/4 cup butter
1 tsp vanilla (optional)
4 cups marshmallows (I actually did 5 and added more rice crispies too)
5 cups rice crispies (I did 6 cups here)

Melt butter in large pot on low. Add marshmallows and stir constantly until they are all melted. Take off heat and add your rice crispies. Stir lightly until evenly covered.

Then I lightly buttered the inside of the eggs I used for this first and then just started spooning some into each egg. You may want to get some little helpers to make it go faster, before the rice crispy treat mixture cools too quickly. (And they will love helping anyway!)

I served mine still in the eggs, so no need for decorating, BUT...f you want them more colorful, you can serve them OUT of the plastic eggs and add some sprinkles or mini m&ms pressed into them.

So fun and so quick and easy!

Minion Winter hats Find

Check out the talented Heather from "My Threads of Whimsy" on etsy. She made these two adorable minion hats for my little ones and they love them!!! Adorable! And she has even more designs, great communication, fast shipping, and was great to work with. Thanks again Heather!


Action shot and all! :)

There is so much talent on etsy! It's my favorite place to shop!


Tuesday, April 15, 2014

{Unconventional} Campfire dinners at home!

I've been eating clean for the past two months and here and there before then. I think it all started with my husband finding out he had hidden food allergies a couple years ago. At first it was just his meals that changed, then mine more often and it has since changed to the whole family most of the time. Yes, we still have our nights where I have to throw something together quickly and so it's hot dogs or pizza, but those nights are becoming more and more rare.


Well last week, I made what I call "foiled dinners" and what my husband calls "hobo dinners" (otherwise known as campfire dinners in foil). Typically they consist of russet potatoes, hamburger, onions and carrots. But this time I catered each one to each member of the family.


My husband and one daughter got sweet potatoes rather than russet. I opted for neither. The other kids wanted your typical russet potatoes. I added sweet peppers, summer squash and onions to mine. While my husband can't have the onions and loves asparagus. So I changed out the veggies in each one to make them individualized.


 It was soooo yummy and everyone was happy! You can also change out your meats. We did turkey burger this time, but sausage, or chicken work too. I would love to do fish way too but it cooks so much faster, I might have to play around with which veggies would work in the same amount of time. Anyway, it was great and easy to pop right in the oven rather than in a campfire!


One of my family's fav meals! And clean eating too!
 Just think outside the box!


Wednesday, April 9, 2014

SLAVING AWAY!

I can't believe it's already Wednesday! This week seems to be flying along as I have have been a slave to cutting vinyl for oodles of orders thanks to a featured decal shown on Young House Love a couple weeks ago shown here. Love her house crashing on that site. What a fun idea and great way to see so many ideas! I would LOVE that job! haha Thanks for mentioning me though! :)

Meanwhile, I have snuck a little time here and there to:

gut out my girls room (now the walls are screaming to be decorated and bedspreads to be made!),

(I can't wait to be in our own home again, where I can paint the walls!)

ordered fabric for Easter dresses (which now are ALSO screaming to be sewn!),


threw some chalkboard vinyl on my girls' little table for them,


designed this fun little vinyl waiting to go up on my newly dubbed "wall of wisdom" (quotes) :)


and created some pretty clean eating meals and baked whole wheat bread!

'

Who DOESN'T love homeamade pico/salsa. I discovered I LOVE it on quinoa!

Can't wait to start some more fun stuff, but for now...back to those orders! Thanks for the love everyone! Excited to get them all in the mail to you! :)

Friday, April 4, 2014

From this to that Friday Box style

For those of you who are newer on here, Fridays are my favorite, bc I love posting often everyday items that I turn into something else.

A year or so ago I posted "From Box to Bin" here. I took some of the many many many! Girl Scout cookie boxes I had and turned them into cute bins for my house. I still have MORE to do! To date, that is still one of my fav posts. :)

From this:


to...


I even posted a tutorial on how to make this bin yourself on the original post linked to above if you'rein the mood for a little DIY project of your own.


Well, there is sooooo much else you can do with boxes. I never got to show you my kids' Valentine boxes this year, so I thought I would show you those today as more items you can make with a regular box/container around the house.

My daughter used an oatmeal container to make a purple minion for hers. :) Turned out much easier than I thought it would be. He looks a little funny to me, but she was happy, so I was too! :)


And I have to say I absolutely love the trash can my son made out of a Nike shoe box. LOVE!


So, don't throw out ALL of your boxes. Keep a small stash in the attic for that one time you wish you still had some laying around. :) And I'll be showing your more ways to recycle some of that household trash soon too!

Hope you have a great weekend!

Thursday, April 3, 2014

{Fireplace Mantle} Decor on a Dime

If you have visited my blog before, you have probably seen several different variations of decoration on my fireplace mantle this past year. I LOVE changing it up! Whether it's for holidays, birthdays, seasons, you name it! Well this one I thought of back in December. I was thinking about the New Year coming and was thinking that my "theme" for the year should be "blessed". My life is not perfect, nor are my children or husband, nor am I, but I truly do feel blessed. When we take the time to think of the many things that we have in our life, our perspective and attitude changes for the positive. I wanted this constant reminder in our home more. So, here it is!


I love combining ideas, or metal and wood, or old and new, so I tried some of that this time too.


 I used my old fence wood chunky frame again (that you can find on the side of the wood to make a DIY yourself), but added a little color with some fabric flair I got from scraps I had and a little twine.


This was just a scrap piece of pine wood I had laying around. I spray painted it with a metallic hammered metal look and browned the edges trying to get more of an older sign look. I wanted our family to be our "feature presentation" in our home, not the TV or other things. We are all here for each other. So I also included a fam pic and a few more 8x10 fam pics I had (or you can get printed for minimal and threw them up in the negative photo prop frame I have just as is.)


I had a couple of these photo cubes from a couple years ago and thought they would be great to add to the mix and give more height variation son the crackled glass candle holders (which I found at Tuesday Morning back in the clearance section for just $7 ea! Love that store!) I needed one more and had this plain black one that got started for a project and never finished, so I threw a family crest shaped vinyl on it with the first letter of our last name. If you don't have a vinyl cutter, good old fashioned paper and scissors work great too!)


 And then I grabbed some burlap I had and stenciled the letters on and spray painted black to change up the burlap too.


So, all in all, I spent very very little and used mainly what I had around my house. Now I know you might be thinking, but I don't have those around my house. The point is...just change up what you DO have and add a couple of new things and a DIY project or two and you will have a totally updated new look!