Here's another card that they made at a club night that I missed-and another new technique. It is a faux silk technique. You actually stamp the images on tissue paper, crinkle the tissue paper all up, open it back up, and then use a glue stick to glue it down to white cardstock.
The second card is one we tried right after the first with some silver tissue paper and with a friend's stamps and supplies. We had limited supplies, but it's always fun to have a challenge and was a good learning experience for our friend too. We even embossed without a heating gun! (used a travel iron!) I am thinking I will still add some accessories to it yet...maybe some silver brads and some other things???
Tuesday, November 25, 2008
Faux silk
Sunday, November 23, 2008
Fun turkey craft for kids-Disguised Turkeys

 I posted this on my family blog, but thought I would post it here as well for those of you that don't know my family. It's a fun and easy craft for kids to do for Thanksgiving! You can click here to go to my other more detailed post and for the template.
Enjoy!
Missed club nights
 Well, I obviously missed my FTTT Friday. Oops! I honestly just thought about it tonight. I was working daily and nonstop on some photo books for Christmas presents that I HAD to get done by Saturday. And I can't even promise that it will happen this week with Thanksgiving, but I AM working on something and am excited to see it done soon!
Here is a card that I just got to make from a stamp club night I missed a couple of months ago. I think she called it an Iris something center. I think it came out great and it's always fun to learn and try new techniques. Thanks S!
Thursday, November 20, 2008
Busy! Busy!
Ever since I guest blogged last week and spent so much time stamping (which was wonderful!), I have had to try and catch up on other things I kinda ignored some of those days, so I haven't been able to post much...although! I actually have made a few cards with some friends this week and started another card that I think I am really going to like...now I just need to find time to finish it. I have also been trying to get some picture books done for Christmas presents...so sorry I haven't had more this week, but I will post soon. :)
Great little Gifts
I posted this on Lindsey's blog and thought I would share it here too.
I have had several ideas I have wanted to make lately for small gifts to give to family and friends. What I really like about them all, is that they are good for beginner stampers as well as "seasoned" stampers. :) Everybody will like any of them and can use all of them!
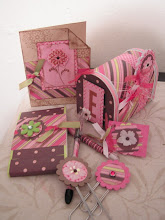
 The first one is this cute little tin full of stampin goodies (above). You can put whatever you want in them, spending as much or as little as you want. You can fully alter/cover them or just add a couple of embellishements as decoration. For this one, I just used my Tree of All Seasons stamp, chalked it with pastels, and added a couple of little leaf punches and a ribbon. I also added a few silk flowers around the goodies in the tin to add a bit more color. Inside it, I have a punch, some jumbo paperclips, some brads, a spong
 e, a bone folder, a couple of markers and a blender pen. I also added a little ring on the side with a bunch of punches pre-made (card candy) to be used on future cards or scrapbook pages. I love card candy!
 This second pic (above) is a picture of the supplies to put together another idea to give away card candy. You can alter/cover and decorate something as small as this "bandaid tin" (and you really don't even have to buy this kind, just use the one you have at home for real bandaids!) Then add a bunch of card candy...anything from brads, rhinestones, tags, punches, snippets of ribbon, clips...whatever you want!
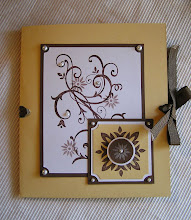
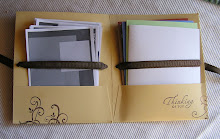
 Last picture I have for you is a portfolio with cards inside. (pictured above) You can put as many cards in it as you want (and that can fit!). I got the idea from my sister-in-law's blog here.
You start with a regular sheet of 8.5x11 sheet of cardstock, score it in half at 5.5, then on the long side, cut an upside down V, and fold it up. You'll then use sticky tape to tape up the sides and a crop-a-dile to punch some holes. Decorate the front and then run some ribbon through the whole thing. At this point, you can do a couple of different things. You can make some cards to give them and put them in the portfolio (for them to be able to use and give away). The cards can be all made with the same stamp set (It's fun to give this away with the set of new stamps this way.) or they can all be totally different. You can include envelopes on one side and cards on the other, or just fill both sides with cards. OR you can put some blank cards in there (pre-folded) and a stack of printed card sketches/layouts on the other side (which you can find TONS of on splitcoast). With this 2nd way...it's fun to give them the little box of card candy along with it! (For a little more detailed instructions, click on the link above.)
I have to say that I love how the front of the portfolio turned out. I really like the colors and the classic simplicity look as well. I think I'll have to make more of these portfolios. It's a great way to give just a few cards away, but make it look soooo nice!
Monday, November 17, 2008
New Scrappin' style
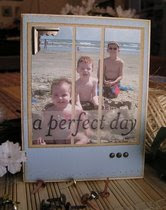
I mentioned awhile back, that my scrapbook's for this year were going to have a different look to the pages from the previous ones done. Well, here are some new ones for ya!
I am making my collages on my computer and printing them at the store as 8x10's. Then I put them on a 12x12 sheet of cardstock and decorate a simple strip of paper along one side and add a little journaling. I am enjoying 1) the combination of the ease of putting them into collages on the computer and posting many pics on one page and 2) the creativity and enjoyment I get from doing a little by hand as well.
 (The second, smaller pic I posted is to show how you can add more room for journaling. ANd BTW-I have not added the journaling to any of these yet.)
I would love to hear what you think about them and any constructive criticisms or suggestions you may have.
 Thanks!!!
Robyn Bobbin Bo Bobbin
Sunday, November 16, 2008
More stamp club
Here are the other two projects that I made at stamp night for November.
A super easy and cute little box filled with hot chocolate packets and marshmallows! Here is a link to where you can find the template to make the box. (We used wadded up saran wrap and inked it to make the background textured look.) And another fun card! I have been wanting to do this dahlia fold flower for months and finally I got to!!!!
 Lots of fun!
Christmas cards
If you didn't get a chance to check these out on my friend's blog, where I was guest blogging last week, here they are again.
Here are two very different Christmas cards, one very unconventional and the other more conventional (with a twist in the format).
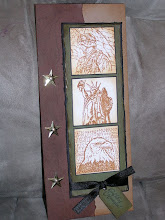
I really like the swirly Christmas tree in Stampin' Up's new "Snow Swirled" set, BUT unfortunately I don't have it, so I thought I would try my hand at making a similar tree.
I used the swirl from my "Priceless" set, and the small flower looking stamp from "Baroque Motifs" To create a similar looking Christmas tree. And wala! Here is what I came up with.
 The "Blessed" stamp is from my retired "So Very" set, which I still use a lot and love! I think this card is prettier in person when you can really see how it sparkles. (The second pic shows a little more of the sparkle.) This card was very different from my normal style and honestly kinda weird for me...but I like the difference and thinking outside of my norm.
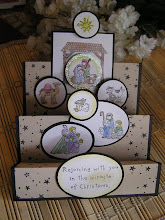
I also wanted to use some more traditional looking stamps, so I pulled out this old retired Stampin' Up set called "The Nativity" and thought it would make a great stair step card. (You can find the dimensions here.) It's simple, yet I love the way it came out! The stars are from "Background Basics". At first I was going to stamp them all over, but started on the sides and decided I like them there only. I still can't decide if it needs a brad in the front at the bottom of the sentiment or something like that. Thoughts? Suggestions?

Hope you like!
TFL!
Saturday, November 15, 2008
Stamp club
We had our stamp club night last night and I really liked everything we made! Here's a couple of cards that we made.
The first one was really fun to make. I posted a few pics to show you how it opens up. You write your msg on the back side of the oval. I would love getting this in the mail! How fun!


This one (below) has a faux tear. You tear a sheet of paper and put it on top of the card. Then ink a brayer and roll it across the part that you want to look like it has another paper on it with torn edges. I'll post the other projects we did another day. (I need to finish one still.) :)
Thursday, November 13, 2008
From this to That Friday
I can't believe we are already to Friday again. I was excited for this week's FTTT and am excited for next Friday too. (You'll have to wait and see what I am working on! I wish it was for me!) :)
Anyway, here is my FTTT for today.
I started with this: 1-A glass frame that I bought about 5 years ago from a dollar store and have never used. (I pulled it out of a box in the closet and thought it would be perfect for Stampin' Up's rub-ons!)
2-Rub-ons from Stampin' Up (that I have had for months and months and never tried!)
3-Picture of my daughter
4-Some stamps, ink, and paper
And no idea what I was going for...
AND...
I came up with...
 I love it! I can't decide which I like better-the frame with the pic of my daughter (now in black and white-it almost looks like those pics that come with the frames, but I promise, it isn't!) :) OR the little sentiment I put together. What I do love!!!! is that I can change it around and even make something different to put in it. You could do seasonal stuff/quotes/etc or different pics. It makes me want to do more!!!
Anyway-hope you liked and can use as inspiration to make something for yourself!
Happy Friday!
Robyn Bobbin
Guest blogging
 I started guest blogging today for Lindsey and was trying to think yesterday what I was going to post on my own blog...I was thinking that it would be nice to post some different things, but I don't have the time to come up with double the projects, sooo...I'll most likely post some of the same and then more on here later.
For now, here is one of the projects I posted on her blog today. It' s the Technique Lover's Challenge on Splitcoast this week (TLC194), on Monday. It's a super-duper easy-to-make Christmas box that you can fill with candy or whatever your heart desires! And it's so easy, that you can make a bunch of them to give out this Christmas! (The template and tutorial to make these can be found here.)
I'll post the rest of my cards and projects on here later, AND/OR you can go on over to Lindsey's blog, here, to see them now as well!
Thanks for stopping by! :) Smiles!
Robyn
Wednesday, November 12, 2008
Room Parent Handouts
 I mentioned a week or so ago, that I had been busy with school PTO stuff-well I am the Room Parent Coordinator for my two youngest kids' school this year. I have been trying to get a packet of information out to all of this year's room parents and this is what I was busy making. I sent the folder (shown below) home to all the room parents full of helpful information and then sent the little info cards to the teachers, with a magnet on the back, so that they could hang them up somewhere in their classroom. I also made the card (shown above), with a pull-out bookmark, for an office staff member that has helped me a lot! They are not all that fancy, but I don't have any kind of budget, so I got the folders from the school and kept them simple. I still think they had to be kinda fun to receive??? I'm excited to do little thank you's for the room parents as the year progresses. :)
 (Their mascot is a raccoon if you haven't figured that out yet.) :) I printed most of this stuff on my computer-except for the bookmark above. That is a stamp.
Tuesday, November 11, 2008
Been busy!
 I've actually been busy stamping! Can you tell? (But then, the laundry isn't folded. Shhhh!) :)
I have been wanting to use this set for months now and finally did yesterday! I thought they turned out cute. I really seem to like the square cards lately. This one is 4x4. Again, very simple. I didn't even color it all, but liked it this way-didn't want to add too much. I actually made more than one of these and on almost every one, I changed something...where I put the tag, used staples instead of brads on some, changed the ribbon, etc...but I think this is my fav and was of course the last one I made. :)
The majority of my stamps that I use are Stampin' Up, but every now and then I get a few from other places. This set is from "My Favorite Things". I ordered it when I got the "Think Pink" set I used for the Breastcancer Awareness stuff I made. Anyway, thought I could use this one for so many people-friends, sisters, almost anyone-take out the sisters and maybe even for my dad!!! (He LOVES chocolate!)
Simply Baroque
 A very simple card, yet classy I think. I kept thinking, do I need to add more? like polka dots around the white circles or something, yet I think it needs to stay simple. Thoughts?
Saturday, November 8, 2008
Guest Blogger
 Guess what?!!! I have been chosen to be a guest blogger on a very talented bloggin/stampin friend's blog! She has this wonderful retreat coming up, which I WISH I was going to, but the next best thing, is to get to be her guest blogger, right? I was very flattered that I was chosen to do this. She is amazing! I have no idea where she finds the time. Her scrapbooking style is soooo much MORE than mine, and I love her cards and other projects that she makes! Anyway, check out her wonderful work and creative ideas here on her blog, Stamp with Linz. I'll be guest blogging for her from November 13th-16th! So...hope to see you there!
Robyn Bobbin
Friday, November 7, 2008
From This to That Friday
Okay (How many posts do I start that way? haha), Let's play a game if you will...Let's pretend it is still Friday...since yesterday I was feeling horrible and could not get enough energy up to post this. Deal? :)
I mentioned earlier that I would start these From this to That Friday's and that they would be anything from papercrafting to anything around the house even, so... This week's FTTT is a really simple one. A space saver and organizational angel for me! The first pic is a picture of my shelf that I kept my paper on before I found this treasure. Not really nice looking, nor very easy to find what I was looking for. Well, I am not ashamed to say that I found this new treasure of mine set out by the side of the road to be put out with the trash. Yes, I did stop and picked it up. I couldn't help it! I knew exactly what I would/could use it for...and wala! Isn't it great!?? (I still don't have all the papers on there quite yet, but almost...I know that there are other things you can buy-drawers, shelves etc to do this same thing, but this was free for me! :) (Yes, I know it doesn't always happen like this.) Anyway, I love my before and after pics, and even more so, I love using this so much better than the way I had things arranged before.
 Look for more ideas next week! I'm excited for my next one!!! (And if any of you few that read this :) have anything that fits under this category and want to email it to me, please do and I will post it as well.)
Thanks for looking! Happy Friday! LOL
Robyn
Thursday, November 6, 2008
Love it!

My sis-n-law sent me this cute cute card! You'll have to click on it to see it larger and read the sentiment! LOL I love it!!! I love the card-the way she created the cute eve/awning (what do you call that?) that hangs over it, the colors...everything! Thanks so much M! (You can check out her cute creations here.) Don't you love getting cards and letters in the mail (that aren't bills and junkmail)?
Wednesday, November 5, 2008
Coming soon, to a theater, no a blog!, near you!
Ever since I wrote on here (a few weeks ago) a post titled, "From this...to that", I have thought of several other things that fit under that title as well and I love them all. I love finding things and sprucing them up or turning them into another creation-whether it be papercrafting or other things. I also LOVE seeing these same type of ideas from others. SO....I decided to make Fridays here FTTT Fridays (From this to That Fridays) or maybe F3T's. SO...look to this Friday for my first official one!!!
...and now a week later


 I REALLY did mean last Wednesday, not this one to look for more posts, but life seemed to get in the way. (In particular Halloween and all the festivities, as well as some stuff I was making for our PTO Room Parents)! Although I just have to say how happy I was with the costumes I made for my kids!!!!! Check out
  the picture! Way cute and so original right? I love
 d them and so did my DH and kids. You can see more pics on my family's blog here and more deets about them there as well if you want them.) Nonetheless, here is my post I promised, albeit a week late. Maybe you can use the ideas for next year.
Last year I made these cute brown bag brooms that I still think are too cute! You can fill them inside with whatever you want! I though t they were so cute and easy that I would make another this year.
I also made these cute and simple little treat boxes for my piano students as well as these cute witch shoes that I have been seeing a lot of this year. They look much harder than they are. They really are so fast and easy! It's just cutting out a template and taping them all together and adding the finishing touches and a bit of candy! (The pictures are above, at the top, and there is one pic of the template cut out before I folded and taped it together.) (Also, I actually printed them out three different sizes and like the smallest size the best.) I put a ruler next to them to show you the smallest size. I think that is actually 50 percent of what the original size was and it printed out that way from one  link. Another link printed about 75 percent and I enlarge the 50 percent one to a full 100 and made all three sizes. (The pic is only of the smallest size. That way you can even do two shoes or just one still. I also saw a post on splitcoast where someone did these as glass slippers!) Here is where you can find the template. There are a ton of o
 ther examples if yoiu search under "witch shoe" on Splitcoast too. (And yes, the witch's shoe was one of the sneak peak's from a couple of week's ago. Good job L at guessing what it was! The other sneak peak is still in the works.)
I've also been wanting to make this mummy card for the past two years and finally did this year!
 Another idea that we did for decorations for the tables at an Enrichment (ladies church activity) a few years ago (when I was over Enrichment) were these cute gnarled looking paper trees. Once we made one, it was easy from there on, and it was neat to see how each one turned out different from the previous one. We also punched out little leaves in fall colors and sprinkled them around the tree and put the candy corn pumpkins around as well on the tables. (We didn't put ghosts around it-this is Family Fun's stock pic. I don't have a pic of mine-should make another...) I got the idea from Family Fun here.
 Last thing I made was this cute little card that I saw here on Splitcoast. (Man! Do I have enough hyperlinks in this post?!) I changed it up a bit and think it would be sooo cute hanging from the brooms (making it smaller) or just the way it is as a card. I'm thinking that next time I might try stamping and embossing the Priceless stamp set swirl on the boot in a dark purple????
Anyway, some Halloween fun for you...maybe next year you can use some of these ideas if you want. :)
(One more idea that is fun for kids is found here at Family Fun. It is the template of a skeleton (separate bones) that you can just print out (and laminate if you want-I have a laminator, so I did that.) and let your kids have fun putting it together and hanging up in your window or on the wall each year. I actually posted this earlier last month on my family's blog, but thought I might as well mention it here too in case you wanted it and don't know my family-therefore you wouldn't check my other blog.) Here is a link to my post about it on my other blog and a pic of ours as well if you want to check it out.
Hope your Hallweens were great!


Subscribe to:
Posts (Atom)
Welcome!

Hi! I'm Robyn from Create it. Go! and I love to create! Whether its a wood craft, painting, papercrafting, simple sewing, vinyl, new recipes, photography adventures, or fun with my Silhouette, join me for tutorials and loads of fun!


Follow me on Instagram!

Member of the Glue Dots Design Team

Find me here!


POPULAR POSTS
-
 Two of my nieces are graduation from high school this year...the oldest and first in the cousins of my kids! So I have thought about grad gi...
 -
 So how many of you procrastinate? I sure do! I always work better under pressure, but not always sure that's a good thing. And I hope I...
 -
 Are you still looking for a fun and quick gift? Want something different? Well, I have the perfect little idea for you! And it's so fun...
 -
 This shop has been compensated by Collective Bias, Inc. and its advertiser. All opinions are mine alone. #BringingInnovation #Collect...
 -
 This shop has been compensated by Collective Bias, Inc. and its advertiser. All opinions are mine alone. #DropShopAndOil #CollectiveBi...
 -
 So So So excited to share this week's From this to that Friday with you!!! I thought of this last year and never got a chance to make i...
 -
 The FB Silhouette Challenge Group I recently joined challenged us to use fabric in our projects for February on our Silhouette machines, ...
 -
 This week my daughter's class celebrated the 100th day of school. They were all told that they could dress up the way they think they w...
 -
 Whether you are wanting to make the nativity ornaments or the Minecraft, the inserts all work the same. And they are sooooo easy! Supplies...
 -
 A friend found this quote and came over to my house to make it and I loved it so much I made one too! I want to create a little reading noo...
I party at:


target="_blank">


Button Up!
I'm a member of the Church of Jesus Christ of Latter-Day Saints and proud to be an #ldsmommyblogger

If you would like to know more, you can click on the picture of Christ above.
Papercrafting Below:
Card portfolio
Inside view
Side-view

Stair-step card
Army Pride
One Sheet Wonder Layout

More OSW with Sunbeam Stamps

Photo cards


Gig 'Em!