January 2014 ~ Create it. Go!

Friday, January 31, 2014

From this to that Friday {OLD Bedframe Headboard Re-Purposed}

You probably know by now that I love to re-purpose or upcycle things. (Along with some DIY...these are probably my favorite things!!) Well, that's what I did for today's From this to that Friday!

Do you remember last week when I posted these two items and said they somehow go together? Well, you'll see how they all fit it now!


My husband was so kind (seriously! I was excited!) to find and bring home this OLD metal bedframe/headboard. I even loved the dried vines it had on it and left them on! How fun! My mind just started going in so many different directions as to what I could do with this and where it could go! I honestly can see this one being a changing one, but for now I started out simple.

It fit PEREFECTLY on the shelf we have in our entryway and I immediately knew what I wanted to do!

I love it! Check it out!
I started with this:
and added some pictures and quotes on and above it and turned our entryway into this!
I seriously did NO prep to the headboard. Left it as is. :)

 Love the functionality of this area!
  I added a couple of fun quotes that I cut out in vinyl, but just applied to designer paper and hung up as well.
I love how the quotes all go together about our family being together too!
 I got the above little block from a friend and a children's leader at our church. (Ginger at GingerSnapCrafts...isn't she great!?) ;) She made them for all the children's teachers for this years theme! It worked great here too!
]
I love how I can change out the pics and have pics up from years ago and today! Love it!

Thursday, January 30, 2014

Organization=Therapy { Our Clipboard Craze}

I don't know about you, but for me...the more cluttered my house is...the more cluttered my mind feels. We moved this past summer and it was kinda like a fresh start for me I decided as far as how some things are organized in my house. I am just now finishing up this organizational project for our house and love how it is working.

You know when your kids come home from school with a bazillion papers? I used to just have them put them in a drawer and we would go through it when it basically wouldn't shut anymore. lol Yeah, not working anymore. Well, I was driving through a restaurants drive thru and saw this idea in through the window. I don't know what they used them for, but I knew what I could use them for!


I went out and got 6 clipboards, one for each of my kids and an extra for a quote or for household misc paperwork that needed to not be forgotten and decorated them up a bit and hung them on the wall. (I used vinyl to cut out and make stencils, and then just spray painted on them and took the stencils off. The letters are vinyl.) They turned out so fun and look like decoration up on the wall! lol (Especially since they match my dining room curtains!)

The black strips in between each row of clipboards is chalkboard vinyl that I use to write little notes each week to remember for each child and what they have going on that week.


They each have their monogram (or initials) on the clip part of each board to help them and me remember who's is who's. I had thought of putting their initial on the actual bottom of the board, but then you can't see it when papers are on there, so this worked!


AND...I absolutely LOVE the way they are working! When my kids come home with a Book order or a paper that needs turned back in...or something else that doesn't constitute saving it and filing it (which, yes...I got that set up too!) or throwing it away it goes on their clipboards. (So something we need in the near future and don't want to lose in a stack of paperwork!) It works great!

For my little ones, they hang their artwork up there, since they don't have any other paperwork right now that needs attention. This works great for that too!


So easy and yet makes life so much better! Now I don't get frustrated looking for the field trip permission slip they brought home last week! What do you do with all the paperwork in your house? I love hearing new ideas.

And By the way...this is what they look like now! Maybe not as pretty, (lol) BUT they work!

Wednesday, January 29, 2014

Superbowl Snacks and Football Fun for the kids!

It's almost time for the Superbowl! That means yummy snacks and entertainment to keep the kids busy!

I shared a yummy cinnamon roll recipe last week here that would be perfect for a sweet treat during the game. Buuuut...if you're looking for more than that...I put together a collections of the best snacks and treats for the big game! Sure to please both adults and kids both!!!


They all look soooo good, don't they?! From your basic soda and drinks, and cookies, to your chocolately pretzels and crock pot homemade Chex mix, to the chocolate covered strawberry footballs and stadium snacks...they're all perfect. Check them all out below!

In order of pics left to right, top to bottom:
1-Your basic goodies: candy, cookies and drinks!
2-Whipperberry's taco bites I found at yumpins.com
3-cutefoodforkids.com
4-Crock pot chex mix (source unknown, but what a great and easy idea! Just get the recipe off of the Chex cereal box!)
5-Chocolate covered strawberry footballs (image found pinned from no known source)
6-Leftover potato Skins from createivemeinspiredyou.com (they look sooo yummy!)
7-Crackers and cheese Stadium (source unknown from pin)
8-chocolate kiss and m&ms melted on pretzel squares (source unknown from pin)
9-Apple helmet and football sandwich from spoonful.com

PLUS if you want a few more goodies I found on Pinterest, you can go to my Pinterest board here.

And....you can't forget a little fun for the kids too. Here are just a couple of easy and quick activities for them!

Rememeber Paper Football? My kids still love it! And what makes it even more fun?!!! A $2 tablecloth that looks like a football field to do it on. (Walmart) PLUS it doubles for your snacks too!

And just in case, you have never made a paper football...

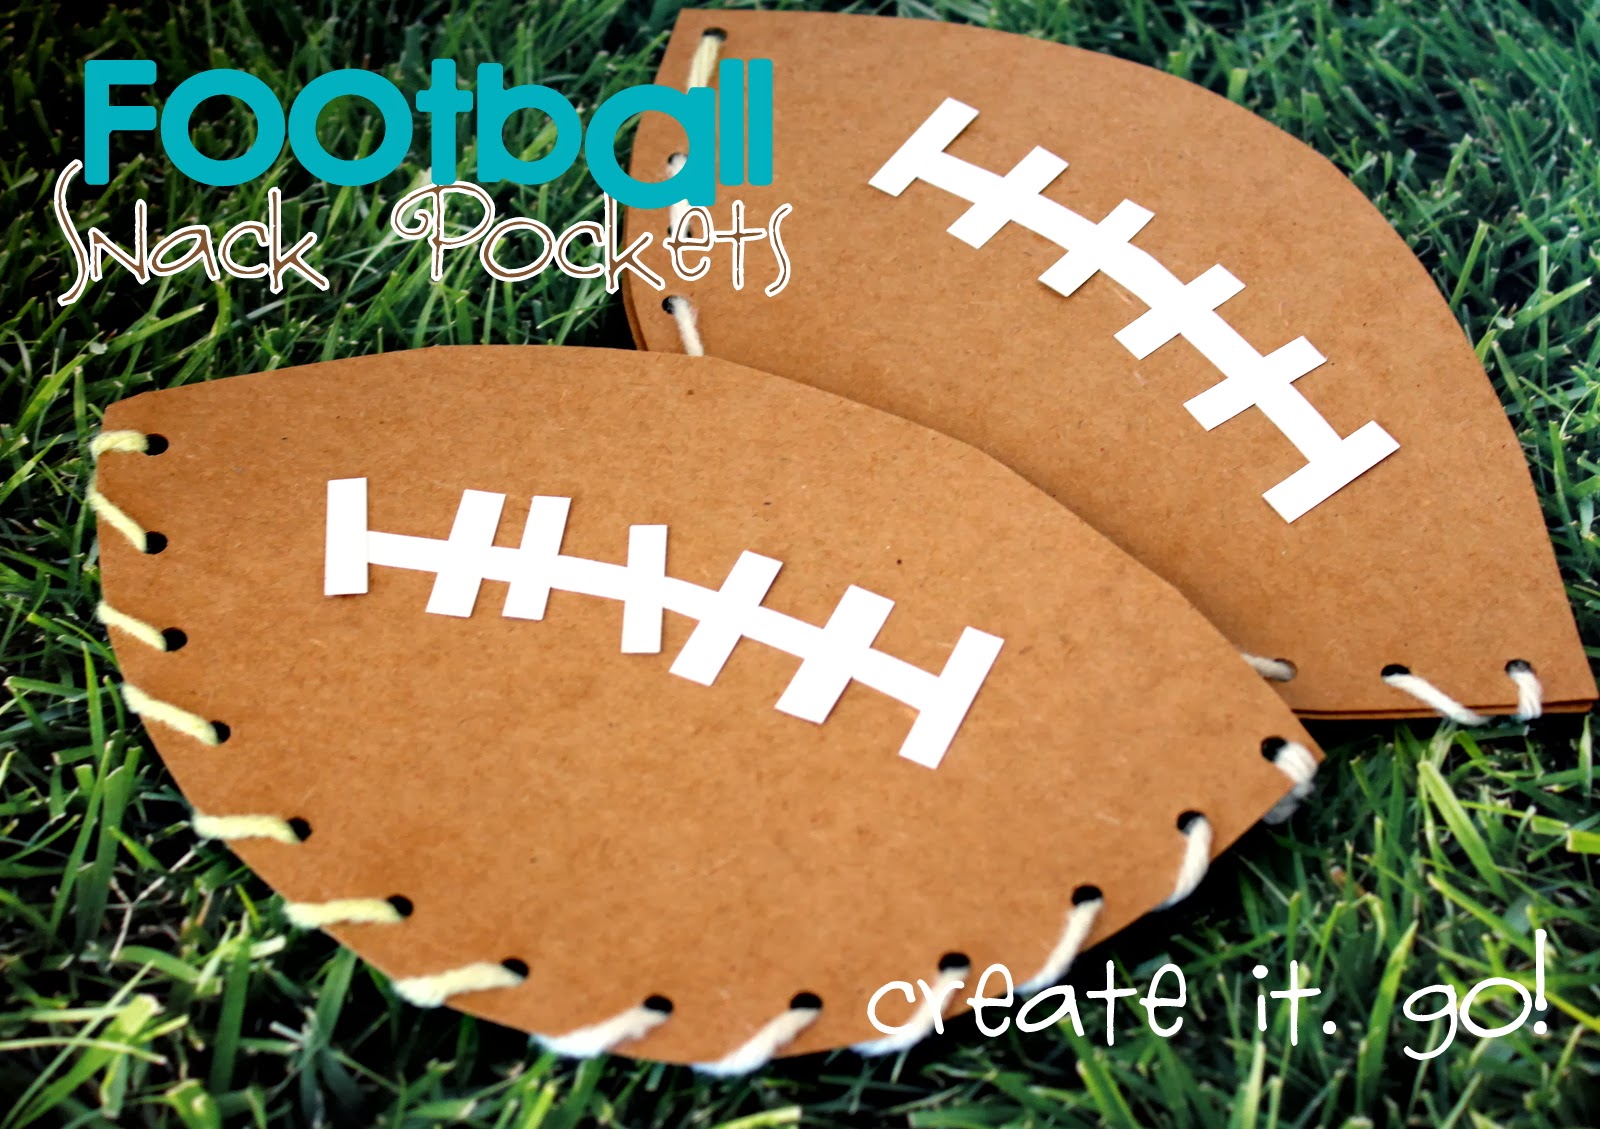
and another fun little activity to keep their little hands busy for awhile! Plus it doubles as their treat holder!

You can make this with craft foam or just brown cardstock. (I just cardstock bc I had it on hand already. The only other thing you'll need is a paper punch, a little white paper and glue, and some white/string (or color or your fav team!) yarn.

I started with a full sheet of cardstock and folded it in half. then I cut out the shape of a football and some small white strips to let the kids glue on as the laces. I cut the yarn and put some tape around one end so it would be easier to thread through the holes. Then I punched some holes along the bottom of the football and let the kids go at it!


 If you noticed, my kids both laced it up two different ways, but either way, it turned out great!

 It looked asesome! 


She thought so too!!! She was proud of it too. Funny girl!


 So fun! Hope your kids will enjoy it too!


Have a great Superbowl weekend!
Tuesday, January 28, 2014

Try it out Tuesday! {DIY Mason Jar Soap Dispenser Tutorial}


Have you seen those cute mason jar soap dispensers around etsy and Pinterest? I have but haven't seen a lot of tutorials or at least easy ones for them, so I thought I would try it out! It was really so fast and easy!

I found this pint size blue tinted glass Mason Jar at Walmart in their craft section for under $2. (They also have your typical plain ones if you prefer that as well.) Grabbed a bottle of handsoap. I prefer the foaming ones, so I wanted that top on my mason jar. And went home and got to work!


I didn't want to mess with drilling, so I grabbed my crop-a-dile that I love!!! and cuts through soooo much! And started punching around a circle.


 I kept going until the center popped out. (You may have to do another row around that one depending on the size of the pump that you are going to put in this hole. Make sure you don't make it too big though where the hole would show through on the sides of the pump when inserted.)


 I took the soap out of the bottle I bought, poured it into my mason jar and made sure the pump fit in the hole. 

 It fit great! Last two steps were to paint the mason jar lid matching colors and then glue them together. (Just make sure that you use both paint AND glue that work on both plastic and metal.) That's it! There you have it! A fun DIY mason jar soap dispenser in under a half hour and for under $4!

Monday, January 27, 2014

Hogs and Kisses in a Can!

Want a fun and inexpensive idea for a small, cute gift for Valentines Day? This one is great for your kids, your kids' teachers, your friends, special someone...anyone!

And pretty simple too. All you need is a small piece of red or pink paper, a can (I used a tomato paste can...but I think this would be adorable in a mason jar as well!) a bottle top lid, some red or pink paint (I had red on hand...) and some candy kisses. 
Throw it all together and there you have it! (The eyes I did actually cut out some vinyl eyes, but paper or googly eyes would also work. The tail is just a circle cut around and around [like a snake] and adhered with a glue dot.)

As I made this, I wanted to include this cut stamp I have had for years and was thinking I would just hang it from a tag or something, but then thought "How fun would it be to put on these super cute heart paper ticket shapes I have from the SIL online store and include little "coupon messages" on them as well!?" I love it! I decided that I would even make coupons for my kids this year. Kids are always making them for their parents, but why not have it reciprocated? I love the idea of not just saying "I love you" one day, but showing your love continually throughout the year. Last year I made this fun little chalkboard "I love you because..." board that we would write on and leave in someone's room and then they would pass it on and do the same for someone. I love how it went from one person to another for weeks. So, the ticket idea is a fun way to keep the love flowing too!

 They go great together, don't you think?
Love this little guy! So fun!
 Keep coming back all week, because it's going to be a good one!!!

Friday, January 24, 2014

From this to that Friday {DIY Repurposed Drawer}

It's my favorite blog day of the week again! This week has gone by fast!! Seems like it was JUST Friday.

I'm excited to show you today's project! I have barely kept it this long! Wanted to spill the beans on it for about a week now! I love it!

I had this old drawer that I brought from our previous home. I mean OLD too. It was a house built in 1953. We gutted the bathroom when we were there and remodeled it and added another bathroom. Well...when we did. I kept one of the old drawers that had been in a cabinet in there and have been meaning to repurpose it ever since. Well, now when I look at this drawer, not only do I love that it is repurposed, but it is also a momento from our loved home we just moved from. So fun! (And it makes me smile!)

So, here it is! I went from this:


Just a plain OLD drawer, a fun shape and needs some cleaning and paint and a bit of hardware.


to this!

It was a great and easy DIY project! I gave it all a base paint and then made a vinyl stencil for the background. I then painted the light blue/aqua on and removed the background stencil. The I added the black vinyl, the drawer pull hardware, and distressed it bit.
I love it! I love how it's updated and clean and bright and fun! But I also love the distressed look I kept to remember and preserve the age and look. I have it hanging in my laundry room above the dirty clothes sorting baskets (that I showed you on a previous post). It's perfect there! (I also love the play on words within an actual "drawer". lol Yes, I make myself laugh sometimes. haha I'm
weird like that.) :)
I have another repurpose for you next week too! (So love repurposing!)